Showing posts with label Canned.. Show all posts

10.24.2012

Drying Apples.

dried apples

Since we don't eat a lot of applesauce in these parts, I decided to dry at least one of my 5 gallon buckets of apples. I don't particularly like dried fruit but Jake loves it and it's been a struggle finding snacks that he loves that aren't time consuming to prepare in the moment. I want to have snacks around that he can grab in an instant and keep going with his day.

My mom got us this dehydrator for Christmas last year and this is my first time using it. In the past I've always dried my fruits and vegetables in the oven so having a dehydrator was quite exciting. Let me tell you, it's so simple and easy to use. I would definitely recommend this for someone who is new to dehydrating and/or feels uncomfortable dehydrating in the oven.

So far we've only done apples and bananas but have grand plans to dry some cranberries soon too. I just have to work through all of these apples first. I'm considering purchasing a couple extra trays to take it from a 4 tray to a 6 tray dehydrator so I can do more at once but that isn't really a priority. Oh, and apparently you can also use it for jerky, which I might have to try at some point. I know a ton of people who just love jerky.

What's your favorite dried fruit?

6.01.2012

Lemony Cherry Jam

Pitted Cherries

Cherry Jam is my very favorite flavor of jam. It probably has something to do with cherries being my favorite fruit. When we went to California for my cousin's graduation there was a guy selling cherries on the side of the road. They were a overpriced but still less than what they are in the grocery store (cherries are so expensive!) and I just couldn't help myself.

Lemon Cherry Jam

When the jam was cooking I tasted it and although it was amazingly delicious, I wanted to add something to lighten up the flavor a bit. I decided to add some lemon and it turned out perfectly and has quickly become my new favorite cherry jam recipe.

Ingredients:

8 c. pitted cherries
5 c. sugar
zest and juice of 1 lemon
1 box pectin

Before you start cooking your jam, fill up your water bath canner and turn on the burner, it takes awhile to bring it to a boil. Wash your jars in hot soapy water or on the sanitize cycle of your dishwasher. Put your lids in a small pot and warm them up on the stove so the rubber becomes soft, do not boil them.

Add cherries and sugar to a large non-reactive pot. Stir so the sugar mixes with the juices from the fruit. Bring to a boil and cook for a good 20 minutes. 

Add the lemon zest, lemon juice, and pectin and let jam boil for 5 more minutes. It should be a "rolling" boil, where even if you stir, it's still boiling.

Turn off the burner, skim the foam from the top of the jam and fill your jars leaving 1/4 inch headspace.

Wipe rims of jars with a wet cloth and then dry, apply lids and bands and process for 10 minutes. When your 10 minutes is up, remove your jars from the canner and wait for the little "pop" that they've sealed. If any of them don't seal (it shouldn't take very long to know if they haven't) pop them in the fridge and use within a few weeks.

5.30.2012

Washi Tape as Canning Labels.

Washi Tape

My Aunties use masking tape to label their homemade applesauce and to label canned food with an expiration date. I have 8 jars of peanut butter they have given me with these homemade labels. While the labels are useful, they are hideous. I finally bought myself some washi tape for my birthday and I thought it'd be a cuter, updated label for my jars.

Washi Tape Canning Jar
I didn't notice it at the time but this jar of jam made for a great little mirror. 
It's true, there are many companies that make labels for canning jars, or you could even design and print them yourself. My issue with those labels is that they are a giant pain in the ass to later remove from your jar when you want to re-use it. It requires lots of scrubbing, the use of oil, or a razor blade. The washi tape is easily removed, and you won't end up with Madonna arms from all the scrubbing.

5.15.2012

Vintage Canning Lids.

IMG_1304

I asked Jake to get me canning lids in bulk for my birthday. I had even put them in my shopping cart on lehman's but just before I went to order them, my Auntie called and told me not to buy any canning lids because she had some she was going to give me. Little did I know how awesome they were going to be. Last summer she gave me 100 jars. I love knowing that someone else in my family once shared my love of canning. 

IMG_1309

IMG_1306

One box has 12 of these beautiful lids with matching white rings. I'm pretty sure I will end up keeping these forever instead of using them. Why don't they make pretty lids like this anymore? They should, they are a million times cooler than the boring silver colored lids.

5.04.2012

Strawberry Peach Jam.

strawberry peach jam

When I was trying to decide on a third strawberry recipe Jake suggested using some of the peaches I had canned last summer. I thought it was a great idea, I had canned 22 lbs. of peaches and Jake promised he'd eat them all but has fallen behind so I opened up a jar and got to work. I love how this jam turned out, I'm not a huge strawberry fan so this had just enough peach in it to even out the strawberry flavor and make it taste light and summery.

4 c. hulled and chopped strawberries
2 c. peeled and chopped peaches
4 c. sugar
2 T. lemon juice
1 packet powdered pectin (this is all the local store has, if you prefer liquid, follow instructions on packet)

Some notes before we go on. The sugar quantity I listed is for fresh fruit. Now, if you pick up a box of low sugar pectin, you can use less sugar. Alternatively, there are sugar substitutes you can use such as honey or splenda.

The easiest way to peel a peach is to blanch it. If you don't know how to do this, I've found this handy and short video to help.

Before you start cooking your jam, fill up your water bath canner and turn on the burner, it takes awhile to bring it to a boil. Wash your jars in hot soapy water or on the sanitize cycle of your dishwasher. Put your lids in a small pot and warm them up on the stove so the rubber becomes soft, do not boil them.

Add fruit and sugar to a large non-reactive pot. Stir so the sugar mixes with the juices from the fruit (it will look like a thick pink mess at first). Bring to a boil and let cook for 15 minutes. Be sure to keep an eye on it so it doesn't boil over or burn. Strawberries especially like to foam alot. Sometimes it's helpful to add a pat of butter to help keep the foam down.

Add pectin and let jam boil for 5 minutes. It should be a "rolling" boil, where even if you stir, it's still boiling.

Turn off the burner, skim the foam from the top of the jam and fill your jars, leave 1/4 inch headspace.

Wipe rims, apply lids and bands and process for 10 minutes. When your 10 minutes is up, remove your jars from the canner and wait for the little "pop" that they've sealed. If any of them don't seal (it shouldn't take very long to know if they haven't) pop them in the fridge and use within a few weeks.

5.02.2012

Christmas Jam (Strawberry Cranberry Jam)

christmas jam

I bought some strawberries at the store the other day at a pretty good price. I split them up into 3 batches and made traditional strawberry jam with the first batch. I don't particularly like strawberries myself so I sat down to think about what I could do with the other two batches and remembered I still had cranberries my uncle got me last fall in the freezer. I decided to make a batch of strawberry-cranberry jam. After considering ratios of fruit and sugar for awhile I went ahead and began. I decided to google it to see what other people had come up with and found that this is called Christmas Jam, the name made me smile.

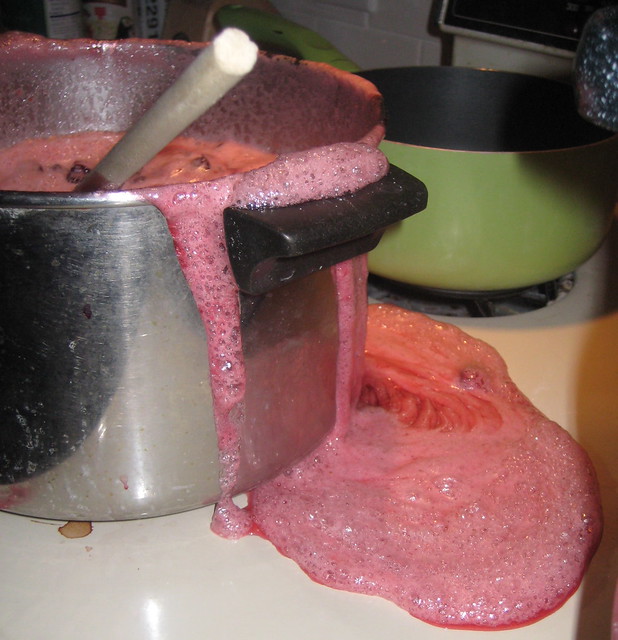
oops_jam

I haven't been canning for 40 years but it's not my first time either and this was the very first jam I ever let boil over. I made a mess, and I mean a huge mess. We had to pull the stove out so I could clean up all of the jam kind of mess. I think it's time I bought myself a proper pot for cooking jam, the ones I use are a little small for my liking. Half of my jam ended up all over the floor and stove but since it wasn't burned, I was still able to put up what was left in the pot and man was it tasty. I figure everyone is bound to make at least one giant mess when canning in their life, right?

cranberries

So, here is the revised version of my recipe, for a smaller batch, so hopefully it won't end up all over your floor too:

4 c. hulled and chopped strawberries
3 c. cranberries (you can cut in half but most tend to "pop" open when boiled)
5 c. sugar
Pectin (optional)
I had to let this cook down for a long time to get it to the gel point so you may want to consider adding pectin to help it along. Strawberries are naturally low in pectin but cranberries are high in pectin so you can get away without adding more pectin if you want.

Before you start cooking your jam, fill up your water bath canner and turn on the burner, it takes awhile to bring it to a boil. Wash your jars in hot soapy water or on the sanitize cycle of your dishwasher. Put your lids in a small pot and warm them up on the stove so the rubber becomes soft, do not boil them.

Put strawberries in your pot, add sugar, stir. Heat on med, stirring until sugar is dissolved, you want to be careful not to scorch the sugar on the bottom of the pot.

Add cranberries, bring to a boil. As it boils, the cranberries will pop open, releasing juice. Boil until it reaches the set point. A good way to do this is by having a small plate in the freezer, put a little drizzle of jam on it, once it's cooled, if it's wrinkled and not rolling around your plate, it's ready to go.

*If using pectin, follow directions on the box for proper boiling times and when to add the pectin.

Turn off the burner, skim the foam from the top of the jam and fill your jars, leaving 1/4 inch headspace.

Wipe rims, apply lids and bands and process for 10 minutes. When your 10 minutes is up, remove your jars from the canner and wait for the little "pop" that they've sealed. If any of them don't seal (it shouldn't take very long to know if they haven't) pop them in the fridge and use within a few weeks.


4.30.2012

Traditional Strawberry Jam.

strawberry jam

It's strawberry jam week here on Trailer Gypsy. I spent last week working up 3 fun jam recipes all centered around strawberries that I'll be sharing throughout the week.

One of my canning books from the 70s has a recipe for strawberry jam and all it says is 4 cups strawberries, 4 cups sugar, process for 10 min. Hysterical. I love how they went into so much detail. I'm sure that recipe would've worked but you would have to process it for a long time to get it to the set point. Strawberries are fairly low in pectin so it's a good idea to add a little. Here is the recipe I like to use for strawberry jam.

6-7 c. hulled and chopped strawberries
4 c. sugar
2 T. lemon juice
1 box powdered pectin
1 tsp. each cinnamon and ground cloves (optional)

Note: I like really chunky jams so I only mash a few cups of strawberries but some people like to leave about half their strawberries chopped and then take a potato masher to the other half. Another thing you can do is macerate your strawberries which is basically letting them sit in sugar overnight. You can use about half of the sugar to macerate, and use the other half the next day while you're cooking the jam. I usually skip this step.

strawberries

Before you start cooking your jam, fill up your water bath canner and turn on the burner, it takes awhile to bring it to a boil. Wash your jars in hot soapy water or on the sanitize cycle of your dishwasher. Put your lids in a small pot and warm them up on the stove so the rubber becomes soft, do not boil them.

Add strawberries, lemon juice, cinnamon, cloves, and sugar to a large non-reactive pot. Stir so the sugar mixes with the juices from the fruit (it will look like a thick pink mess at first). Cook on medium for about 15 minutes, until it thickens up a little. Be sure to keep an eye on it so it doesn't boil over or burn. Strawberries especially like to foam alot. Sometimes it's helpful to add a pat of butter to help keep the foam down.

Add pectin and let jam boil for 10 minutes. It should be a "rolling" boil, where even if you stir, it's still boiling.

Turn off the burner, skim the foam from the top of the jam and fill your jars leaving 1/4 inch headspace.

Wipe rims of jars with a wet cloth and then dry, apply lids and bands and process for 10 minutes. When your 10 minutes is up, remove your jars from the canner and wait for the little "pop" that they've sealed. If any of them don't seal (it shouldn't take very long to know if they haven't) pop them in the fridge and use within a few weeks.

4.25.2012

Pressure Canning Salmon.

cannedsalmon

My pressure canner intimidates me. You know, because it can explode, which is scary. Plus, I couldn't find answers to a lot of questions I had online. I thought google knew everything? I tried it out anyway and while I'm less intimidated, it still makes me a little anxious to use it. I used to feel that way about water bath canning too so I'm sure that feeling will dissipate with more use.

canned salmon

The very first thing I canned in my fancy schmancy pressure canner was fresh caught wild King Salmon. None of that farmed fish here on the coast! I got the fish right down at the docks. Since I'm vegetarian and Jake will be the only one enjoying the salmon, I canned it in half pint jars so none will be wasted when he opens a jar since half pints are basically one serving. I learned a lot by reading about canning salmon. You have to descale it but you can leave the skin on, apparently it has a lot of nutrients in it. Also, you can leave in any bones as they'll become soft during the canning process (but not in Halibut, you have to take those bones out). I can't wait until Tuna season, I'm going to can a ton of it, especially if I can get a good deal on it.

The ONLY safe way to can meat/poultry/fish is in a pressure canner. Do NOT water bath can meats.

If you're interested in canning salmon, here are the resources I used:

Always follow USDA guidelines for canning. Section 5 is on meats, poultry, and seafood.

Here is a very boring but informative video that goes through the entire process.

4.16.2012

Pickled Asparagus


Some people can year round but for me, canning season generally starts with pickled asparagus. It's Jake's favorite so I keep an eye out for good prices and try to put up a lot of it. In Idaho you could pick your own all over the place but I don't know of anywhere to do that here. I have been doing some research into local u-pick farms for canning a little later in the season. I'm excited to get into the full swing of canning again this year.

For those of you who aren't obsessed with canning jars, Ball began producing pint and a half jars again, they are pictured above. I am excited about them because they're the perfect size for asparagus and also make great drinking glasses. They're on store shelves now and come 9 to a box.


2.07.2012

Cranberry Apple Jam.


Cran-Apple juice is my very favorite so I was so excited to make cranberry apple jam. I searched the internet for a recipe and as usual, was able to find one on Food in Jars. I followed the recipe fairly closely but I did make a few changes. I used a 1:1 ration of cranberries and apples and added 1/4 tsp. each of cinnamon and ground cloves and a little pinch of nutmeg. Delicious!


Some of the jars my Aunties gave me last summer are extra special to me because of this sticker on the bottom. My Auntie used to work at the dmv and she would take the registration stickers for the month of March home and put them on her jars, as her last name is Mar. I love them because they remind me of her, and canning with her when I was a kid. Also, those things are pretty much impossible to remove, not that I'd even try.

1.12.2012

Cranberry Sauce.


My Uncle got me two big boxes of cranberries for Christmas, fresh (and then put in the freezer) from the Oregon Coast. I'm a huge cranberry fan so I was really excited to start working with them. I've only used about 1/4 of them so far and I have so many ideas for more canning goodness.

This Thanksgiving I had some killer cranberry sauce and so I decided to make some of my own to eat throughout the year. This was hands down the easiest thing I've ever canned. It requires almost no prep. There is no peeling, no dicing, no blending into tiny pieces or removing seeds. It was wonderful!


Ingredients:
Two 12 oz. packages of frozen cranberries or roughly 6 cups of cranberries
a small amount of either cranberry juice, orange juice, or water
1/2 t. cinnamon
1/4 t. ground cloves
1/4 t. nutmeg

Wash your cranberries, be sure to remove any sticks.
In a non-reactive pot (make it a big one) bring an inch or so of liquid to a boil (I used cranberry juice).
Once liquid is boiling, add the cranberries.
Let them cook for about 15 minutes or until most of the cranberries have popped. Don't worry if all of them don't pop, it's quite alright.
Stir in your spices, turn off heat and fill your jars, leaving an inch of headspace.

Wipe rims, add your lids and bands.
Process your jars in a water bath for 15 minutes.

This makes about 3 pints of amazingly delicious cranberry sauce that be can accompany meat, mashed potatoes, eaten alone or used like a jam.

10.25.2011

Homemade Applesauce Tips.


This weekend I made a batch of homemade applesauce and I have a few tips I thought I'd share.

1. Use sweet apples, not sour, that way you won't need to add any additional sugar.
2. Use several different varieties of apples for a more complex flavor.
3. Find yourself an apple peeler/corer or a food mill. I don't own either and cutting and peeling apples by hand takes forever and ever and ever and ever.
4. Continually taste and adjust your applesauce until it tastes how you like it, don't just trust a recipe.
5. If it's too bland, try adding cinnamon, ground cloves, nutmeg, or if it's needs a punch of acidity, lemon juice.
6. You can make mixed flavors of applesauce by adding other fruits, like strawberries or pears.


I rushed home from work to try to take a photo while there was still light outside but it was so cold I just clicked and ran back inside so I'll probably take a new (prettier) photo later. It was around 25 degrees this morning and it's time I take my peacoat collection in to be dry cleaned, one of my cats found them when we moved and decided they were a warm place to lay in.

Hope everyone is having an awesome Tuesday!

10.18.2011

Ketchup and Pickled Peppers.


Earlier this summer, when I first started seeing tomatoes growing on the vine, I started researching ideas about how to can them. I knew I wanted to make sauce with a lot of them, because I use a lot of tomato sauce. I also knew I wanted to can some whole, to chop up later and use in meals and on pizzas. I also came across a recipe for ketchup and I became intrigued. I went to the refrigerator to dig out my bottle of Heinz and was appalled at what I saw on the ingredient list. High fructose corn syrup was the second ingredient on the list. ugh. That stuff is everywhere.

I decided to go ahead and try to make ketchup. Basically it's just a mixture of tomato sauce, onion, and red bell pepper all pureed together. Then you add a little bit of apple cider vinegar, a little bit of brown sugar, and you put some spices in cheesecloth and let it cook down for a long time. It tasted awesome in the pot but I haven't tried it cold yet, that will be the true test. I know it won't be the same as the store brands we love, but I also know it will be better for us and I'm sure we'll adjust to any mild taste differences. I'll let you know how it goes once we finish the rest of the store bought ketchup and switch over to the homemade.

Don't worry, after the cherry bombs absorbed all the vinegar (I had poked holes in them) I added more and re-processed. 


If Peter Piper picked a peck of pickled peppers, how many pickled peppers, did Peter Piper pick?

You can't actually pick peppers that have already been pickled. Sneaky sneaky, Peter Piper. Since peppers don't come pre-pickled I took a little time to pickle some a few weekends ago. We've got cherry bombs, some little green guys from the neighbor's garden, and a couple jars of jalapenos. They're just pickled in a basic vinegar mixture, ready to go for future use in salsas or whatever meal needs a little extra flavor.

I will be finishing up pepper pickling this week as we ended up with more peppers when we prepared for the frost.

10.11.2011

Nostalgic Plum Jam.


When I was a child my dad had 7 or 8 plum trees that lined the edge of his property, providing a partial barrier between the yard and the coastal highway. I loved to eat the little Italian plums in the summer and my brother and I would pick a bunch and carry them up to the neighbor's house so she could can them. When Jake's mom was visiting we stopped at a small produce barn on the side of the road so I could pick up tomatoes and my heart skipped a beat when I saw a box of Italian plums. You see, my dad cut down the trees while I was away at college, in order to build a new mini storage building in the front yard. At the time we had a conversation where I begged him not to cut them down because I am against cutting down trees unless they're rotten and going to fall and harm someone. I was so sad but he told me recently that he had saved one tree for me and that it, "drops fruit all over the sidewalk every year because nobody is here to pick it." I really do have amazing parents who show me so much love.


When I saw the plums at the produce barn I just had to buy some. I filled up a little bag and ended up with about 3 lbs. of plums. I think plums taste pretty amazing so I didn't want to do anything too crazy or unique with the jam, I just wanted to make something simple and delicious.

Ingredients:
3 lbs. plums, pitted and chopped
6 c. sugar
1/2 t ground cloves
1/4 c. lemon juice

I decided to add a tiny bit of ground cloves to my recipe because cloves also leave me feeling nostalgic. Every year at Christmas my mom and I make the best oatmeal chocolate chip cookies on the face of the planet. They are so delicious and as we're mixing the cookie dough, I always catch the scent of cloves and I think that is what really makes the cookies exceptional.

Sterilize jars.
Place all ingredients in non-reactive pot. Slowly bring to a boil, stir until sugar dissolves. Boil until jam reaches the gelling point, stirring continuously as to not burn the jam.
Ladle jam into jars, leaving 1/4 in. headspace. Wipe rims with damp towel, add heated lids and screwbands. Process in a boiling water bath for 10 minutes.

10.06.2011

My Dusty Ol' Canning Cellar.


This is what I managed to can the weekend before I began working. In order from left to right: slow burn relish, tomato sauce, plum jam, plum butter, and pear ketchup. It seems like everyone in town grew peppers this year and people kept dropping them by. I don't really like spicy/hot foods and I wasn't sure what to do with them but I didn't want them to go to waste. I saw a recipe for slow burn relish and thought it might be something Jake and my brothers and sister might like. 

I chopped all the peppers by hand but you can definitely grate them or use a food processor. No matter how you do it, you're likely to get pepper juice all over your hands and it is going to burn. I asked one of my friends who is a chef what I could do to get the burning to go away and he told me to wash my hands in extremely hot water with soap and a good amount of vinegar. It worked beautifully and will be my go to method for the rest of my life. I was able to blow my nose and use the restroom without fear. Just a note, I followed the recipe fairly exactly except I subbed apple cider vinegar for the red wine vinegar. I bought apple cider vinegar in bulk during cucumber season so that's what I went ahead and used. 


I wanted to share a photo of my canning cellar with you guys. I'm still adding to it as I have a fridge full of pureed tomato waiting to be turned into ketchup and a box of apples to work through yet. Just to give you a quick rundown of what you see here:

* Four different kinds of pickles (dill, bread & butter, sweet, and super sweet which I totally made up, canned in 3 different cuts each, spears, chips and whole)
* Corn Relish
* Pickled Asparagus (next year I'm going to can a lot more asparagus, Jake ate almost all of it already)
* Pickled Garlic
* Dilly Beans
* Pickled Carrots
* Whole Peaches
* Whole Pears
* Peach Sauce (can't be seen in the photo but it's there)
* Pear Butter
* Pear Jam
* Plum Jam
* Plum Butter
* Apple Butter
* Strawberry Rhubarb Jam
* Strawberry Rhubarb Vanilla Butter
* Sour Cherry Jam
* Raspberry Jam
* Pickled Watermelon Rinds
* Pear Ketchup
* Vanilla Extract
* Salsa Verde
* Tomato Sauce
* Whole Tomatoes
* Slow Burn Relish

Soon I'll be adding many pounds of white, yellow, and red onions to the cellar. Onions keep really well if stored properly (they need to breathe).

In my freezer I have a medium sized flat rate box full of frozen grapes. I also have frozen slow roasted tomatoes, shredded zucchini, and frozen plum halves.

I can't wait for next year so I can use my new pressure canner to can all kinds of vegetables without having to pickle them. I'm going to use it way before then though. I have plans to make up a nice big batch of chili for Jake to munch on when I'm at work, otherwise I'll have to buy him a bunch of top ramen or something and I'm trying to avoid products like that.

10.04.2011

Canning: Pear Ketchup.


As you know, I recently purchased 25lbs. of pears. After making pear jam and pear butter, I still had a small amount of pears I wanted to use for something fun. I was talking to one of my friend's on facebook, who is a chef, and he suggested trying pear ketchup. He linked me a recipe and I looked up several others. I was able to get a feel for what it was supposed to be like, and went ahead concocting a batch. This stuff is so amazing, I made it as a condiment for meat but once I tasted it I just couldn't get enough. Next year I will definitely be making a larger batch so I can put it on everything, including french fries. yum!

Ingredients:

8 pears (I had bartlett)
1-2 t butter
1 sweet onion, diced
1 c. apple juice or cider
1/3 c. brown sugar
3/4 c. apple cider vinegar
salt
white pepper

Put 3 half pint jars into your canning pot and bring to a boil to sanitize (or use whichever sanitization method you prefer, just don't forget to bring your canner to a boil)

Melt the butter in the bottom of a non-reactive pot, add diced onion, cook until translucent.
Peel, core and dice the pears, add to the pot.
Add juice. Let cook until most of the juice has been absorbed by the pears.
Puree until smooth using a stick blender.
Add sugar and vinegar, taste. It should be tangy, add more vinegar if needed.
Add salt and pepper to taste.
Continue to cook down until it is a thick consistency, kind of like a fruit butter.

Fill your jars with pear ketchup leaving about 1/2 inch of headspace. Wipe the rims, add the hot lids and screwbands.

Process for 10 minutes.

Remove jars and set aside. When cool, remove screwbands and check to see your jar has sealed.

If you are new to the water bath canning method, here is a great page with instructions and photos!


Also, my first day of work was awesome and fun. The bank was really busy and everyone, employees and customers, were super nice.

9.26.2011

How To: Begin Canning.

{via}
I've done a lot of canning this year and as I've shared about it on my blog and personal facebook page, I've gotten many comments by people who are interested in canning but don't know where to begin. They are intimidated by the whole process, just as I was at first. So, I thought today I would share some knowledge on how to get started, where to get the equipment, and which websites I find incredibly helpful.

Equipment:

You'll need a canning pot. There are two different ways to can, in a water bath canner, or a pressure canner. High acid foods, like fruit, can be canned in a water bath. So if you're planning on making jam and pickling things, go with a water bath canner, they're very easy to use and can often be found at your local thrift store for just a few dollars. If you're planning on canning low-acid foods, like meat or veggies that won't be pickled, opt for the pressure canner, it is the only safe way to can low-acid food, do not even attempt it in a water bath canner. I now own both kinds of canners but I definitely use the water bath most often since I'm usually making some kind of jam.

Next, you'll need jars of course. Ask around, I was able to score 100 jars this year from my Aunt who no longer cans. If you don't have any relatives giving away glass jars these too can be found at thrift stores for incredible prices. If you're not sure if the price is a good one, just think, is it less than $8? The lowest price our local store seems to ever have on a box of new jars (around 12-15 jars) is about $8. There are things to consider when buying used jars. Look them over, be sure they aren't cracked, check that the rims aren't chipped, if everything looks good, you're set.

Lids and bands can be purchased at your local grocery/hardware/all purpose store. You need to use a new lid on every single jar. So, once you eat that yummy concoction you've made, you'll toss the lid and buy a new one for next time. The screw on bands however, can be reused over and over.

In addition to your lids, you'll want to pick up a little canning kit for around $10. It includes tongs that are rounded for picking jars up out of hot water, a tool to measure headspace (empty space left at the top of the jar), a magnetic wand for picking up lids out of hot water, and a nice wide funnel which I think is invaluable to me not making a giant mess (which I tend to do).

So, if you were to buy everything you needed brand new, it would be a little spendy, but I'm telling you, check your local thrift stores first. I know one here in town has 3 boxes of jars, a water bath canner and a dehydrator on their shelf right now, the stuff is out there. Canning is increasing in popularity so it's a lot easier to find the things you need in regular stores now too, if you wanted to go the brand spankin' new route.

Canning Websites:

Now that you've got your tools, you'll need some knowledge.

The best, most official, have tested all of the recipes a zillion times to make sure they won't harm you, place to look is the USDA's Complete Guide to Home Canning. Not only does it tell you exactly how long to process everything, it also has a ton of recipes and tells you exactly what to do.

A website I visit often is Food in Jars. Marisa has a beautifully long list of recipes in her recipe index. Not only does she explain things well but she has a Canning 101 series where she answers frequently asked questions and goes over the basics. She also has a great tab at the top of her site for canning resources, including where to find produce and how to find canning classes in your area.

Pick Your Own is also a great site, although poorly designed, with a wealth of information and step by step photos which are so helpful when you're learning the basics.

Go visit your local library. Here in little old Weiser there are at least 10-15 books on canning and pickling, I'm sure your library has a few good reads as well. Check out a few and compare recipes, there are so many variations on every recipe that it's fun to compare and see what sounds good to you.

Where to Acquire your Produce:

Plant a garden! I'm already plotting and planning my garden for next year. If this weren't a rental, I'd tear up at least half the backyard and plant crops, but that's just me.

So you live in an apartment or don't have the means for a garden... check craigslist. Go to the farm+garden section. People often list their locally grown crops there or excess from their gardens at prices that will blow your mind. I bought tomatoes Saturday for 34 cents per pound, it's amazing what is out there.

Google is your friend, search for orchards or u-pick farms nearby. Have you heard of a CSA in your community, check it out!

Farmer's Markets. They are popping up everywhere and have the best your region has to offer.

I'm not a professional and I don't can for a living but if you have any specific questions, I will do my best to answer them or direct you to where you might find the answer. I really want to stress how rewarding canning is. It feels so great to preserve food for your family that you know is fresh, locally grown and delicious. I know exactly what is in my food, and it isn't high fructose corn syrup or fillers.

9.23.2011

More Canning and Other Nonsense.

Tomato sauce, canned whole tomatoes, and roasted tomatoes. 
I went ahead and canned the 25 lbs. of tomatoes first since they wouldn't keep as well as the pears and apples. I got through all of them yesterday, which I was really excited about. I think I may try and pick up a few more this weekend since I want to try a couple other preservation methods, like making ketchup.

Tomatoes slow roasted in the oven then stored in the freezer. 
Jam night last night was really fun. Some people from out of town showed up and it's always nice to have fresh blood in the group. One of the regular players finally replaced the strings on his banjo so we got to hear some wonderful banjo music and now I have, "you get a line, I'll get a pole..." stuck in my head. 

Do you guys have any big weekend plans? Jake's mom is visiting this weekend so I'm sure we'll be really busy with all kinds of fun stuff to do. It'll be nice to have her here for a few days, I know Jake has missed her since we've moved and he's really excited.

I've received a lot of comments from people who are interested in canning but don't know where to begin, check back next week for an intro to canning post. For those of you who aren't into canning, I'll also have a post about my favorite cupcakes, the frosting contains alcohol!

Don't forget, today is the last day to sign up for my giveaway, I'll be drawing a winner tomorrow!

9.22.2011

A Little Progress on the Canning Front.


This is what I had made as of Tuesday night, aka, very little headway. I had gotten through all of the tomatillos, about 10 lbs. of pears, and 4 beefsteak tomatoes from my neighbor's garden that had been in my fridge and were about to expire. That leaves me with 15 lbs. of pears and 25 lbs. of apples, not to mention the tomatoes I picked up yesterday, but we'll get to that later. Have I mentioned we have company coming this weekend and I still need to pick up the house and do laundry? I think I might be a little crazy. 

So, I used the tomatillos to make salsa verde. If you're interested, I based my recipe off of this one from Doris and Jilly Cook. They discuss both the pressure canning and water bath canning routes. I went ahead and water bath canned my salsa, since my water bath canner is already out due to having a zillion pounds of fruit in my kitchen. Because tomatillos are closely related to tomatoes, it is only safe to water bath can them (and any kind of tomato) if you add acid to your recipe. In the recipe she suggests lime juice but I went ahead with a suggestion from one of the canning books I own (Put 'Em Up!) and used vinegar instead. I also used more jalapenos than was probably necessary but Jake wanted it spicy spicy. It turned out to be amazing. I tried to can the salsa in smaller jars to have around to use for just one or two servings, rather than a giant jar that will take up space in my fridge once it's opened. 


Next I went ahead and made pear "jam". Pears are incredibly easy to work with and they taste so good. I used the recipe for pear jam that comes in the pectin box. The only change I made is that I added a tiny bit of cinnamon. The jam didn't firm up as much as I wanted it to. I considered reprocessing the jam to get a better set but decided against it. Right now the consistency is somewhere between syrup and jam and will be perfect for pancakes and waffles.

Since I already had the canner out and full of water, I decided to do something with tomatoes a neighbor had dropped by. She had given us some nice big beefsteak tomatoes and I had 3 left, that were way past the point of me chopping them up for a salad. I added a nice big yellow tomato from my garden and got to work. I decided to make a basic plain tomato sauce because it's easy and versatile. I used small jars for this recipe as well because Jake doesn't like tomato sauce so I'm the only one eating it.


So, you'd think I'd be slowly working through all of that fruit I bought, right? Wrong. I had to go to Boise today to get fingerprinted for my new job and on the way back decided to stop at the Blue Barn. I had seen them advertising on craigslist so I decided to check it out. It's located in Caldwell, Idaho and isn't it beautiful? The flowers are stunning. They not only sell a wide variety of locally grown produce but they also carry pies that looked amazing and locally canned jams. I was exhausted and in a hurry so I didn't poke around as much as I would've liked but I'm sure I'll be back.


While at the Blue Barn I picked up a box of tomatoes, 25 lbs. of them to be exact. I think I'm going to can some whole, make some more sauce, and maybe roast and freeze a few. Marisa has a lot of great instructions over on Food in Jars on what to do with your tomato bounty.

My plan for today is to can, can, can, with some cleaning and laundry on the side. I feel exhausted just thinking about it.

9.14.2011

Giveaway Day!


I've wanted to do a giveaway for a very long time but I wanted it to be good, something that reflected me, and something that I'd actually want to win if it were switched around. I think I've finally got it all figured out. 


ta-da! I'm giving away a half pint of peachsauce (like applesauce but sub peaches) and pickles, and an 8 oz. jar of strawberry rhubarb preserves. You also win the two crocheted dishcloths they're pictured on. I'll very likely add in some other canned goodies that are tbd and I will most definitely be adding in some other crocheted goodies that are useful around the kitchen. In other words, I'll be stuffing that flat rate box like nobody's business. 

How to Enter: 

* Follow my blog (either with google or bloglovin') and leave a comment so I know that you do. 

For Additional Entries:

* Tweet, blog, or post on facebook about this giveaway - leave me a comment with the link to your tweet/blog/fb post. 

* Follow me on twitter. I'm so boring on twitter, I still don't get how it works half the time because I'm a genius; I need people to talk to. @trailergypsy  Of course, leave me a comment here letting me know you followed me. 

Next Friday I'll randomly choose one number that corresponds with a comment and that person will be the winner (not sure if I want to use random.org or put all the numbers in a jar and blindfold Jake and have him pull one out, it sounds more fun to do that. I wonder if I could convince him to let me video it?). 

Be sure that if you don't have your profile setup that you leave your email or a way for me to contact you in case you're the lucky winner. 

Good luck!